During the making of Pinball Magazine were always looking for good photos of the games being discussed. As we don’t own every game, we’re always looking for people who do own one or more certain games and who want to take photos of their game. Naturally Pinball Magazine will mention the maker of the photo in the photocredits.

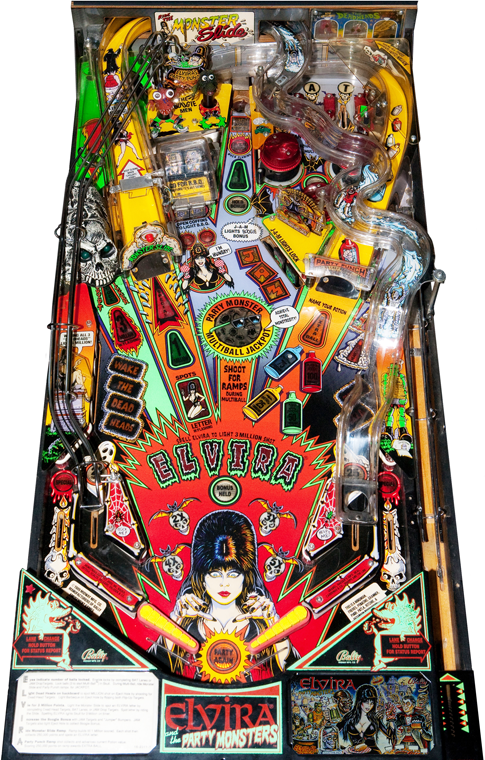
- The ideal playfield photo for Pinball Magazine will look similar to the Elvira playfield on the right.
- Note that the entire playfield is captured in this photo: from the top of the backboard to the bottom of the apron. That’s the main idea.
- To get the best results please remove the playfield glass.
- Please use a real camera set to the highest resolution possible, although mobile phones can deliver good results as well.
- Please use a well lit, or daylight, area. Try to avoid flash (or any other) reflections in the playfield / apron. It is OK to use flash, as long as it doesn’t reflect in the playfield or apron.
- If the game has droptargets, please make sure these droptargets are in their “up” position.
- The ideal playfield photo is a top view of the playfield with the camera positioned in the middle (left to right that is) high above the (removed) lockbar. This should give the photo the right perspective (player’s point of view, but with the camera positioned higher for a better overview).
- For games with a backpanel: if the game allows the playfield to be partly pulled out, like most post 1993 games, please do. This will enable the top part of the playfield to light up better and also shows the entire backboard.
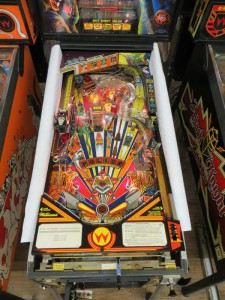
- For games with ramps: if possible put two large pieces of white paper on the insides of the cabinet inbetween the cabinet sides and the playfield. This will make it easier to crop the playfield from the cabinet. See the Police Force photo below how that works.

Police Force playfield. The large sheets of paper on the sides make it easier to crop the playfield from the cabinet. Note the pen at the bottom to lift the playfield, which makes the backboard at the top more visible.
- Please don’t center the camera in the top-bottom middle of the playfield as that will give the wrong perspective on the bottom half of the playfield.
- Please do not use a fisheye lense as that’s not suitable for the purpose of the photo.
- If you’re playfield is heavily worn, please let us know in advance, so we can look for a better looking playfield before you start taking photos.
Backglass photos
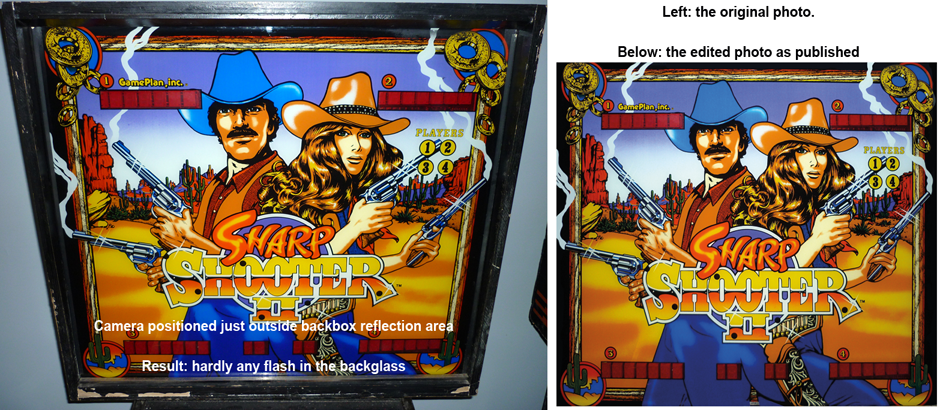
The following illustration may help you making a usable backglass photo:
The key is to avoid having any reflections in the backglass. That may in some cases be a challenge, after all glass is reflective.
- Avoiding a flash reflection can be achieved by not having the photocamera directly in front of the backglass. In the illustration above the camera was positioned above / in front of the backbox. A tiny flsh reflection is visible, but could in this case be removed.
- Other reflections may also appear, like part of a living room or gameroom. Here are some tips to avoid such reflections:
- Take the glass to a location with no disturbing background. E.g: lay the glass on a table inside your house. Chances are a white ceiling won’t be noticable in the photo.
- Or take the glass outside. A blue or grey sky are usually not that noticable.
- Make sure you don’t reflect yourself when taking the photo.

Translites
For translites usually the same approach as for backglasses works well. It is recomended to remove the translite from behind its glass and place on a flat surface. Translites that don’t have a shiny finish can be photographed from the front as there should not be a reflection. For translites with a shiny finish the same suggestions as for backglasses apply. In case you’re able to scan a translite, that would be ideal.
Sending your photos
Please do NOT send your photos directly via email. Use www.wetransfer.com instead. This will prevent our mailbox from flooding and it makes sending photos a lot easier.
